Pages widget

28 June 2012

Steampunk chick!

I'm afraid you'll have to indulge me today! I wanted to try out one of Tim Holtz's metal techniques and thought that this month's Creative Expressions DT stamp set  Butterfly Girl might be a good place to start! I started by stamping the image twice and, on one layering metal tape to it. 
I coloured it with Ginger and Pitch Black Alcohol Inks. I had two die cut wings on my desk so I used the same technique on them. The tag itself is a technique I have used lots, in fact I used it on my first Creative expressions project - you can find the details here. I added a stamped sentiment from the fabulous Art Sayings set from last month and a tiny cog from a watch. 
I did add lots of cogs round the edges but I think she looks better, and more effective, on her own! Thank you for indulging my experiment - I'd love to see what you make with this set!
Signature

27 June 2012

Florally Distressed

This week's challenge at Simon Says Stamp and Show is Depth of Distress! The challenge was in how to interpret it - to use a distressing event as a muse or perhaps to use anything from the Distress line of products?! I decided to take the title pretty literally and create a little depth for me to distress! The inspiration for this came when I was left with the stand after making this last week - what to do with it?! It just seemed like a great stalk for a flower...  
I took some PaperArtsy Metal Card and embossed it with a Bingo texture fade. I then glued it to a large Floral Art Part and cut around it. I then rubbed Little Black Dress Fresco Finish paint on it and removed the excess. In the centre I added Beach Hut paint to the centre and Eggplant to the outside and again I removed the excess. The faucet handle in the centre was inked with Alcohol Inks (Sunset Orange, Sunshine Yellow, Gold). I also used Alcohol Ink (Citrus Green) to colour the 'stalk'.
I used a circles texture fade to emboss another piece of metal card and adhered it to a leaf Art Part. I then used Limelight and Hyde Park Fresco Finish paints to colour the metal. I painted the based in a selection of green Fresco Finish paints and sanded it, highlighting the sanded areas with Black Soot and Vintage Photo Distress Inks. I added a die cut grungepaper banner with a sentiment ('handmade is best') from Wendy Vecchi. The banner was inked with Antique Linen Distress Stain and edged in Vintage Photo Distress Ink and I added two mini fasteners. I stamped and cut two of Wendy's butterflies (inked with Peacock Feathers and Dusty Concord Distress Inks) and added two mini pins as antenna.
I took advantage of the unexpected sunshine this evening to photograph my flower outside - looking at the forecast for the next few days this looks like a rare spot of sunshine indeed! Thank you, as always, for stopping by, your visit really is appreciated.
Signature

Don't Fear!

This fortnight's challenge at Dragons Dream Tag It On was chosen by the incredibly talented Silvia who chose the theme "Don't fear" which is to include a scary image, a crowd of purple and textures (and the obligatory use of at least one stamp and for it to be on a tag).

My main idea behind this tag was putting some things that scare me, but I shouldn't be scared of, all on one tag! I first inked a kraft card tag with Dusty Concord Distress Ink and Distress Stain - this gives a really subtle layering of colour and gives the background a little more interest. Then I added a few water droplets here and there to break up the colour. Then I put part of the tag through my Vagabond with a honeycomb texture fade (I'm not too fond of flying things that sting and so this was my subtle way of including those critters on this tag!) I then sanded the embossed area quite hard to remove some of the ink and highlight the embossing. I then stamped a cobweb and spider from Dyulsions - I don't mind spiders actually but I know others would happily put them into Room 101!
The title was stamped onto kraft card by using individual letter stamps (I have had them for years and have long since lost who the manufacturer was!) held together in bulldog clips! The apostrophe is actually the exclamation mark!
The skull is something I'm afraid of... well it represents horror films which I am truly, truly unable to watch as I'd have nightmares for weeks! What a wimp! So I stamped the skull and misted it in Heirloom Gold Perfect Pearls Mist which is really hard to photograph! A little black ribbon and a couple of staples and I was finished! I hope you enjoyed a quick romp through some scary images and for more inspiration please do pop over and see the rest of the DT's incredible work and then link your own project! We'd love to see it!
Signature

26 June 2012

Happy Birthday StampingbyH!

Now you'll be relieved to know I'll not be singing to StampingbyH (Helen) today as I am really not know for my incredible vocal skills but I did want to tell you that my truly lovely friend Helen is having  a birthday today and thought I'd share the tag I made for her in the hope you might pop over to her blog and wish her a very, very happy birthday! 
If you don't know Helen then please do pop on over to her blog and see what she makes (her journal pages are always incredible!) or find her on Twitter (@stampingbyh) as she is possibly the warmest and kindest person I have had the pleasure to meet. It can be a disappointment when you have 'met' someone via blogs or social network sites and then meet them in the real world - I was really nervous when I met Helen for the first time but she was just so warm and kind that she quickly became a firm friend!
The tag is PaperArtsy paints (and script stamp), inks, stains and a few of my favourite Wendy Vecchi stamps. I wanted to make a huge 3D tag but couldn't find a way to post it so that it would fit through her door (nothing says 'birthday' more than having to trudge to the Post Office to collect oversized items!) so flat it is! Happy, happy birthday my lovely - I hope you have an amazing day!!! Mwah!
Signature

25 June 2012

Olympic fever

It is sports mad Zo's turn to choose the theme for Crafty Boots this time and she chose... (drum roll please)... 'Sport'!!! Eek! I don't really watch much sport. I like F1 and I occasionally catch a little football when David's watching Liverpool but I wouldn't switch on the TV and turn on a sporting event. So, what to do? I thought that I might use the Olympics as my muse and this is what I made...! It was one of those projects which didn't quite go to plan!
I originally sprayed the Art Parts with Dylusions sprays but I didn't like the effects as the project progressed and so I painted the Art Parts and backing card with Nougat Fresco Finish paint. I then sanded the sections and edged it all with Gathered Twigs Distress Ink. The backing card was stamped with Tim Holtz's Wood stamp. 
The Olympic rings were made by running a Stickles lid into various colours of paint and making circles (this was so satisfying!). I made the numbers by die cutting Grungepaper with my Word Play die and then painting, sanding and edging as before. I then adhered them so they overlapped giving a little more interest. 
The whole idea of the piece was to make it look shabby and it looks pretty shabby in real life! Hope you feel inspired to join in with the Sport theme this time and if you need more inspiration why not pop along to the blog and see what the rest of the incredibly talented DT have made!
Signature

23 June 2012

Angel of the South

This is, unintentionally, my Angel of the South. I say unintentionally because that was what David called it when he saw it! If you don't know why he named it this you might want to check out Antony Gormley's fabulous statue! You can see what he means don't you?!
Anyway, I'd had this idea for ages and an enforced trip to the shops to take Tom robot shopping (!) meant I could purchase my manikin and put my plans into action! I have also taken full advantage of the latest Simon Says Stamp and Show challenge which is show some brown! Hardly a problem for me! I used PaperArtsy's Chocolate Pudding and Beach Hut paints along with Gold Paint Dabber. I added Vintage Photo Distress Embossing Powder on highlighted areas, sanded some places and rubbed Vintage Photo Distress Ink into them. 
The ribbon was dyed with Vintage Photo and Peacock Feather Distress Inks and the bauble, pin and key were left over from when I went to Tim's ArtsyCrafts (I have been saving them for such a project! And yes, I still have a few bits to go...!) I also added a few stamped sections of text. As a final touch I added some Chit Chat stickers to the chest and the fabulous rusty wings. I think this might be one of those pieces you keep revisiting... I've suddenly got the urge to add a crown... I'll see if it passes before I do anything rash!
I would like to take the opportunity to wish the fabulous Linda Elbourne well in her new career! This challenge was her last for Simon Says Stamp and, having met her a few times, I know she will make a terrific landlady - I'm hoping to stop by for a pint when you're settled Linda! Hope you're having a great weekend and, as always, thanks for stopping by!
Signature
Edit: I am absolutely thrilled to say that the DT at Simon Says Stamp chose this to be in their top three. Thank you to all for your encouragement x 

20 June 2012

WOYWW 159


After completely forgetting it was Wednesday last week (I know, I know!) I am feeling super smug I remembered this week... but please balance this with the fact that pretty much everyone who is reading this knows that it's Wednesday today and that some brave fellow crafters share their creative spaces once a week hosted by the incredibly lovely Julia! So what have I got to show you? Well, my desk isn't too messy and shows that there's been some activity! Yesterday's Made with Love project for Creative Expressions seems to be propped up and if you look really carefully you can see that I took apart this project and have left some of it on my desk! 
For those of you. like me, who find bad spelling really irritating I do know that my 'STUDIO' letters are all mixed up! I have finally started to do something with them and covered them with music tissue paper ready for the next stage... I wonder what that will be?!!! I'll let you know more when I know! Thank you, as always for stopping by - I really appreciate it!
Signature

18 June 2012

Made with Love

This month's DT stamp set, Art Sayings, from Creative Expressions is again the inspiration for my latest project. I wanted to combine the versatility of this set with my love for Wendy Vecchi's stamps and so I made a little hanging. 
I took a large rectangular frame Art Part and covered it in Picket Fence Distress Stain. I then stamped a zigzag stamp (from Just Sew Artsy) four times in Sepia Archival Ink and then edged the outside and inside of the frame which toned down the whole 'bright white' to be a little more vintage! The background is white card, printed with a background stamp from the same set and then I splodged (I'm not sure if I can make that sound any more than it is!) Old Paper and Antique Linen Distress Stains on top and then dried it. The dress form (button and cotton reel) were die cut and I die cut some sticky back canvas and adhered it to the dress form. I then used Frayed Burlap Distress Ink to edge the canvas and on the dress form.
I then stamped a cotton reel label and thimble (from Art by Hand) the thimble was stamped onto card that was first painted with Silver Paint Dabber. The button was stamped with the same saying and I put a  mini safety pin through the middle. I wound a little twine around the die cut cotton reel and that was that!
This month's stamp set is proving really fabulous and if you need more evidence then please pop along to the new and spangly news blog where the DT blogs are listed on the right hand side!
Signature

17 June 2012

Father's Day

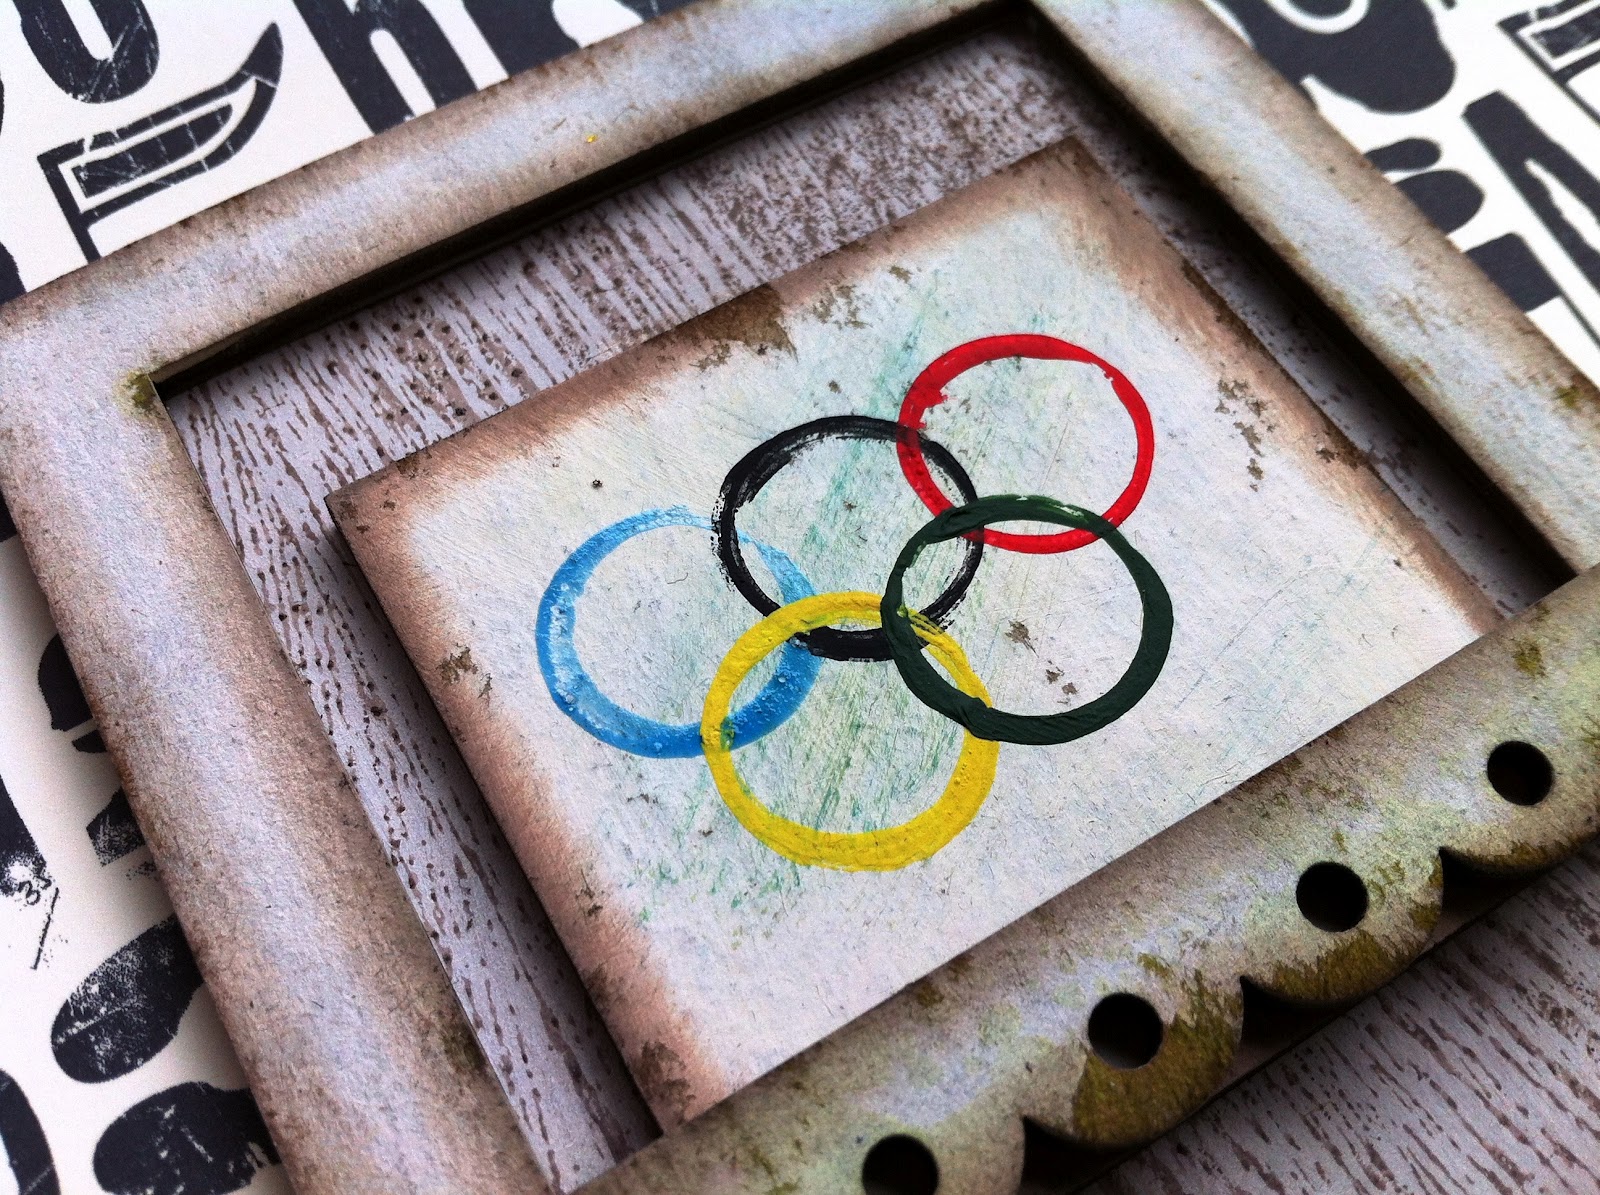
Today, in the UK, we honour our fathers or men who have a similar influence on us. If you aren't as lucky as I am and no longer have your dad with you I extend my love and thoughts. However I do still have my dad and he is is someone who is incredibly special to us (this was how I celebrated his birthday earlier this year) - he taught me to draw with charcoal when I had an incredible dose of chicken pox as a child and we have shared a love of design ever since. This card is a nod to that shared love. The stamps are all Studio 490.
Happy, happy Father's Day Dad, we love you very much x
Signature

16 June 2012

Balm of Friendship

Today is my lovely friend Sara's birthday and I wanted to make something that recognised what a truly lovely friend she is. I used kraft card, Picket Fence Distress Stain and then Peacock Feathers, Picked Raspberries and Old Paper Distress Inks to build up the background. 
I used two Wendy Vecchi stamp sets, Card Essentials and Accents for Art, and a Waltzing Mouse set, Rescue Remedies
Happy birthday Sara, I hope you had a wonderful day x
Signature

15 June 2012

When Wendy met Warhol

I should start by welcoming my new followers - it is fabulous to meet you and I hope you find something of interest here! If you do, let me know!!! The challenge over at the inspirational Everything Wendy Vecchi group this fortnight is bright colours.... eeek!!!! I have been firmly in a kraft card mood for weeks now and I am not sure how bright I can go (especially when I have a really lousy virus which is making me utterly miserable) so I thought I should have a go and somehow went REALLY bright! I hope you are wearing sunglasses or your monitor is turned down as there isn't even a whiff of Vintage Photo Distress Ink on this piece!!! 
I cut four pieces of mountboard at 8cm square and then applied the Distress Ink directly to the pieces of board (Picked Raspberry, Mowed Lawn, Squeezed Lemonade, Peacock Feathers). I put lots and lots of water droplets on them until I was happy (they hardly show on the yellow one!) and dried them. Then I stamped out four images of the chap from Wendy's Call it Art set, on plain white card with Jet Black Archival Ink, and inked them as before. 
The sentiment was stamped on to card and cut out - I would like brownie points for not edging the sentiment in Vintage Photo - I must have reached for it about five times... but resisted!!! I am pleased that I managed to go out of my 'comfort zone' and hope it made you smile! Have a great weekend - I'm off to swoon on the sofa in a dramatic fashion in the hope one of the children feels sorry for me and puts the kettle on...!!!
Signature

13 June 2012

Industrial Chic

Hello! Today it is my turn to choose the recipe for this fortnight's Dragons Dream Tag It On and I have choseIndustrial Chic"- my three elements are: clockwork/cogs, vintage brown and industrial imagery with the only other rules being you need to include at least one stamped image and it all needs to be on a tag! Easy really!
So I used a cogs mask and PaperArtsy Paints (Nougat, Irish Cream and Chocolate Pudding) to make the background. I then stamped a background stamp from Tim Holtz's Steampunk set. The balloon (from his Remnants set) was stamped three times on kraft card and I cut out the balloon to create height. Then I added stamps from PaperArtsy Hot pick 1106. All images were stamped on kraft card in jet Black Archival Ink and edged in Vintage Photo Distress Ink. I then added a couple of watch parts to the basket - I think I remembered everything... cogs and clockwork (check!); vintage brown (check!); Industrial Imagery (check!); stamp (check!) and tag (check!) Hurrah! 
Why not have a go yourself and if you need more inspiration please do visit the rest of the DT - they are a really talented bunch!
Signature

12 June 2012

You Warm my Heart

This month's DT stamp set, Art Sayings, from Creative Expressions is really proving to be the most versatile so far! I am really spoiled for choice as each saying is prompting a gazillion ideas! I think I will be reaching for this set time and time again. This week I have made an ATC but it could easily be a card! I die cut an ATC from white mountboard  and stamped the fabric stamp from Wendy Vecchi's Sentimental Art in Old Paper Distress Ink. I then die cut a heart and covered it with Fired Brick Distress Stain and clear embossed it. Then I used clear embossing ink and embossed it again. As a final touch I sprinkled Heirloom Gold Perfect Pearls on the top and embossed again.
The banner was die cut and the sentiment stamped in Jet Black Archival Ink and edged with Old Paper Distress Ink as before. I would love to know what you would have made with this saying and if you would like more ideas why not stop by the new Creative Expressions blog - there are links to the other DT members blogs and they are really worth a visit!
 Signature

11 June 2012

I'm a Material Girl

It is Tracie's turn to choose the theme for Crafty Boots this time and she chose 'Material'. I don't often use material in my work but it's quite the latest thing to use (if you were fortunate to have attended last weekend's ArtsyCrafts weekend then you'll know all about this!) I made a little wall hanging using Wendy Vecchi Art Parts. 
I started by dry brushing PaperArtsy Nougat paint on the rectangular Art Part. When it was dry I stamped the background stamp from the 'Art by Hand' set in Sepia Archival Ink. Then I sanded the whole piece and edged it in Gathered Twigs Distress Ink. The scalloped Art Part was painted in Chocolate Pudding and treated as before. The manikin was cut from kraft card using Tim Holtz's Sewing Room die. I glued on some calico and then cut round the shape, lightly frayed the edges with my fingernail and then edged it all in Gathered Twigs, making sure I coloured the exposed areas of the card. Around it's waist I tied some thick string tying it through a button. The button was also cut from the Sewing Room die, dry brushed with Nougat Fresco Finish paint and clear embossed. 
The cotton reel was also inked with Gathered Twigs and I wound a thick string around it. The advert was stamped onto kraft card. Please do pop on over and see what the new DT have made for this fortnight and, thank you as always for stopping by!
Signature