Pages widget

29 April 2011

Crowning Glory!

Freya (child no1) asked me to blog her lovely crown that she made for today's street party celebrating the nuptials of William and Kate. The brief was to make a crown for a children's crown competition. She had the bright idea to make a crown of crowns and her brother (child no2!) came up with the idea of covering his with tin foil! 
So using both ideas Freya cut two strips of paper 1cm wide and sellotaped them together in the middle. She covered a sheet of A4 card in tin foil and used Tim's mover and shaper crown die and my wonderful Vagabond and cut out 15 crowns. 
She left one silver and used six colours of Alcohol Inks to colour the remaining crowns (she loves using Alcohol Inks - they give an instant result which is very good when you're 10!) She then stuck them to the head band and then joined the circle. 
In between the crowns she put a silver jewel. It looks really good, in fact too good for a child to have made, so I hope she's not disappointed if she doesn't win!
Congratulations to William and Kate - we hope they have a wonderful day!
Gabrielle x

28 April 2011

Thank you!

I have been trying really hard to make my thank yous for my birthday. Trouble is I am still recuperating from my recent 'procedure' so it has been horribly slow going but I managed to get them finished today! Am so pleased! I needed to make something that was pretty simple as I was going to make a few but that would show that I was really grateful for the gifts I was given.
I cut out tags using my lovely Vagabond that my lovely husband bought me for my birthday (did I mention how pleased I am with it?!) as well as the birds, birdcages, rosettes and crowns (all Tim's dies). The birds were covered in tissue tape before being cut and then covered with Broken China Distress Ink and then the edges dabbed with a Gold Paint Dabber
The birdcages were dabbed in gold and then I smoothed the paint out and I rubbed Brushed Corduroy Distress Ink over it which filled in the gaps. The tags themselves were cut from Tim's paper stacks (think it was Lost and Found) edged with Vintage Photo Distress Ink. 
The rosette was cut from cream card and edged with gold dabber. The crowns were cardboard covered in tin foil and then cut out and then inked with Sunshine Yellow Alcohol Ink. The thank you was printed on my trusty Dymo and I glued a thank you tag from 7 Gypsies on the back.
Hope they like their thank you as much as I liked my gifts!
Gabrielle x

25 April 2011

Welcome!

What a wonderful weekend it's been. We have spent five days just chilling, altogether, in unseasonally wonderfully hot weather! None us seem in a rush to go back to normality tomorrow so when I reminded F&T that they needed to pack their school bags for tomorrow I remembered that our new headteacher was starting too (I wonder if he has packed his school bag yet?!)
I have tried to make a simple welcome tag for a man (I do struggle in making things for men - I don't feel I get the balance of colours/content right) - and a man I don't really know! I met him at the interview (as I am a parent governor at school) but I only really remember he has a beard and that's not really a great starting point! Anyway, where was I? Must be the sun making me easily distracted!
I printed the words (and the welcome message on the reverse) onto brown card (bought from LB Crafts) using the Travelling Typewriter free font (can't remember where I downloaded that from but I use it all the time so it's well worth getting!) I cut out the words and then the tag with my wonderful Vagabond (did I mention how much I love it?!) and used Vintage Photo Distress Ink to stamp some swirls (from Tim's Regal Flourish set) and distress the edge.  
The tag features the lovely PaperArtsy Sunflower that I won as part my prize pack from the incredible ArtsyCrafts day in February. I still can't believe I won it (this was my prize!) If you don't own any PaperArtsy stamps, and you get the opportunity, I really urge you to get some - they are fabulous! We have a class named Sunflower so it seemed very appropriate! Anyway I used black Ranger Archival ink to stamp it. I then painted Mustard Seed, Spiced Marmalade and Barn Door Distress Inks on the flower (the school colours are gold and cranberry).
For the centre I added Rock Candy stickles. I then glued the message on (edged in Vintage Photo Distress Ink) and a ribbon and that was that!
I hope our new head likes the tag - but more than that I hope he likes his new job! I have a few projects sitting on my desk waiting patiently to be finished so I will share those soon!


Gabrielle x

21 April 2011

The sunshine beckons me...

It is an amazingly beautiful day here - the sun is scorching hot (most unusual for April!) and utterly inspiring! I wanted to make something for this week's Grungy Monday challenge at Studio L3 and  oddly I was drawn to Tim's umbrella man stamp (why I looked at the umbrella on a day like today...! Perhaps because I only bought it yesterday from the lovely Lin at LB Crafts!). 
As the challenge was to use texture fades I cut out a tag with my wonderfully fabulous Vagabond (am still utterly in love with this!) from the Crowded Attic paper stack; bravely cut a slit in the top of my collage texture fade (I say bravely, Tim said in one of his videos that it was ok to do this but I am not usually able to bring myself to deface anything I own!); inked my man up in Black Soot Distress Ink on the side that I wanted to be the top and ran it through my Vagabond (did I mention how much I love it?!). I went bonkers and swiped faded Jeans and Peeled Paint Distress Inks over the raised areas and then dabbed Lettuce, Cloudy Blue and Gold Paint Dabbers and sprayed it with Heirloom Gold Perfect Pearls. In case the photo doesn't do the colours justice it looks much like a British five pound note! 
The adage ticket and mini rosette were treated exactly the same way and the Philosophy tag was inked with Aqua Alcohol Ink and highlighted with Gold Paint Dabber. I used a jump ring and memo pin to attach it to the rosette and then used my lovely Dymo to write 'the'! I cut blue, green and gold ribbon in half and attached it at the top. As I was making this I couldn't quite shake the idea that the umbrella man was on his way to work hence the idea of him needing to be reminded to 'Live the journey' instead of just going through the motions of the journey. All this is getting a little deep for such a wonderfully warm day! Time for an ice cream I think! I hope the sun is shining where you are!


Gabrielle x
ps - the title is from the lyrics of Lazy Days by Robbie Williams - and I can't quite get them out of my head!

19 April 2011

Happy birthday to me...!

You know it's going to be a great day when the sun is shining and your lovely husband buys you a Vagabond for your birthday (thank you once again David!) We ordered it ages ago (it feels like that anyway) from the wonderfully tempting LB Crafts and it's been calling my name every day since! I have had a really good play with it today and it really is fantastic - I have had a little trouble with Tim's Tag die going through my Cuttlebug (it would go through but only if you spoke to it really nicely and offered it a chocolate!) Anyway all that hassle is behind me as the Vagabond cuts out beautiful tags every time without the hint of a bribe! I l-o-v-e it! 
I saw this wooden word in HobbyCraft today and at £1.29 it was hard to resist. As it it the theme of my year I decided to buy it and have a play this afternoon. I covered it in Hazel Special paper from My Mind's Eye, added Peeled Paint Distress Ink to the edges and gold paint dabber for additional bling. Then I made embellishments. This is still a work in progress as I want to add things as I learn new techniques (or remember old ones!) so it should evolve a bit more over time. 
I added paint dabbers (Lake Mist and Gold) to a game piece (41 - might be a significant number today!) and foliage (with Lettuce for the leaves) as well as to a Philosophy Tag. The crown came from HobbyCraft. The bird was from LB Crafts (I think - pretty certain actually!) and I covered it in Lettuce Alcohol Ink, dried it with my heat gun and attached it with a brad and a washer. 
The butterfly was cut from acetate on my wonderful Vagabond (I 'heart' my new toy!) and stamped and inked as I did here - I used Lettuce and Aqua Alcohol inks this time! This is my new favourite technique - think I need to be careful I don't put Alcohol Ink on anything that doesn't move!

Thanks for stopping by!
Gabrielle x

18 April 2011

Tim's techniques on a tag...

Simon Says Stamp run weekly challenges and this week I have finally plucked up the courage to enter a creation instead of just making them and wondering if I'll ever be brave! The theme is Simon Says Stamp... a Lord Tim of Holtz Technique. I decided to delve into my fabulous Compendium of Curiosities which my lovely friend Kitty bought me as a birthday present when it was released (and is now somewhat revered in our house!)
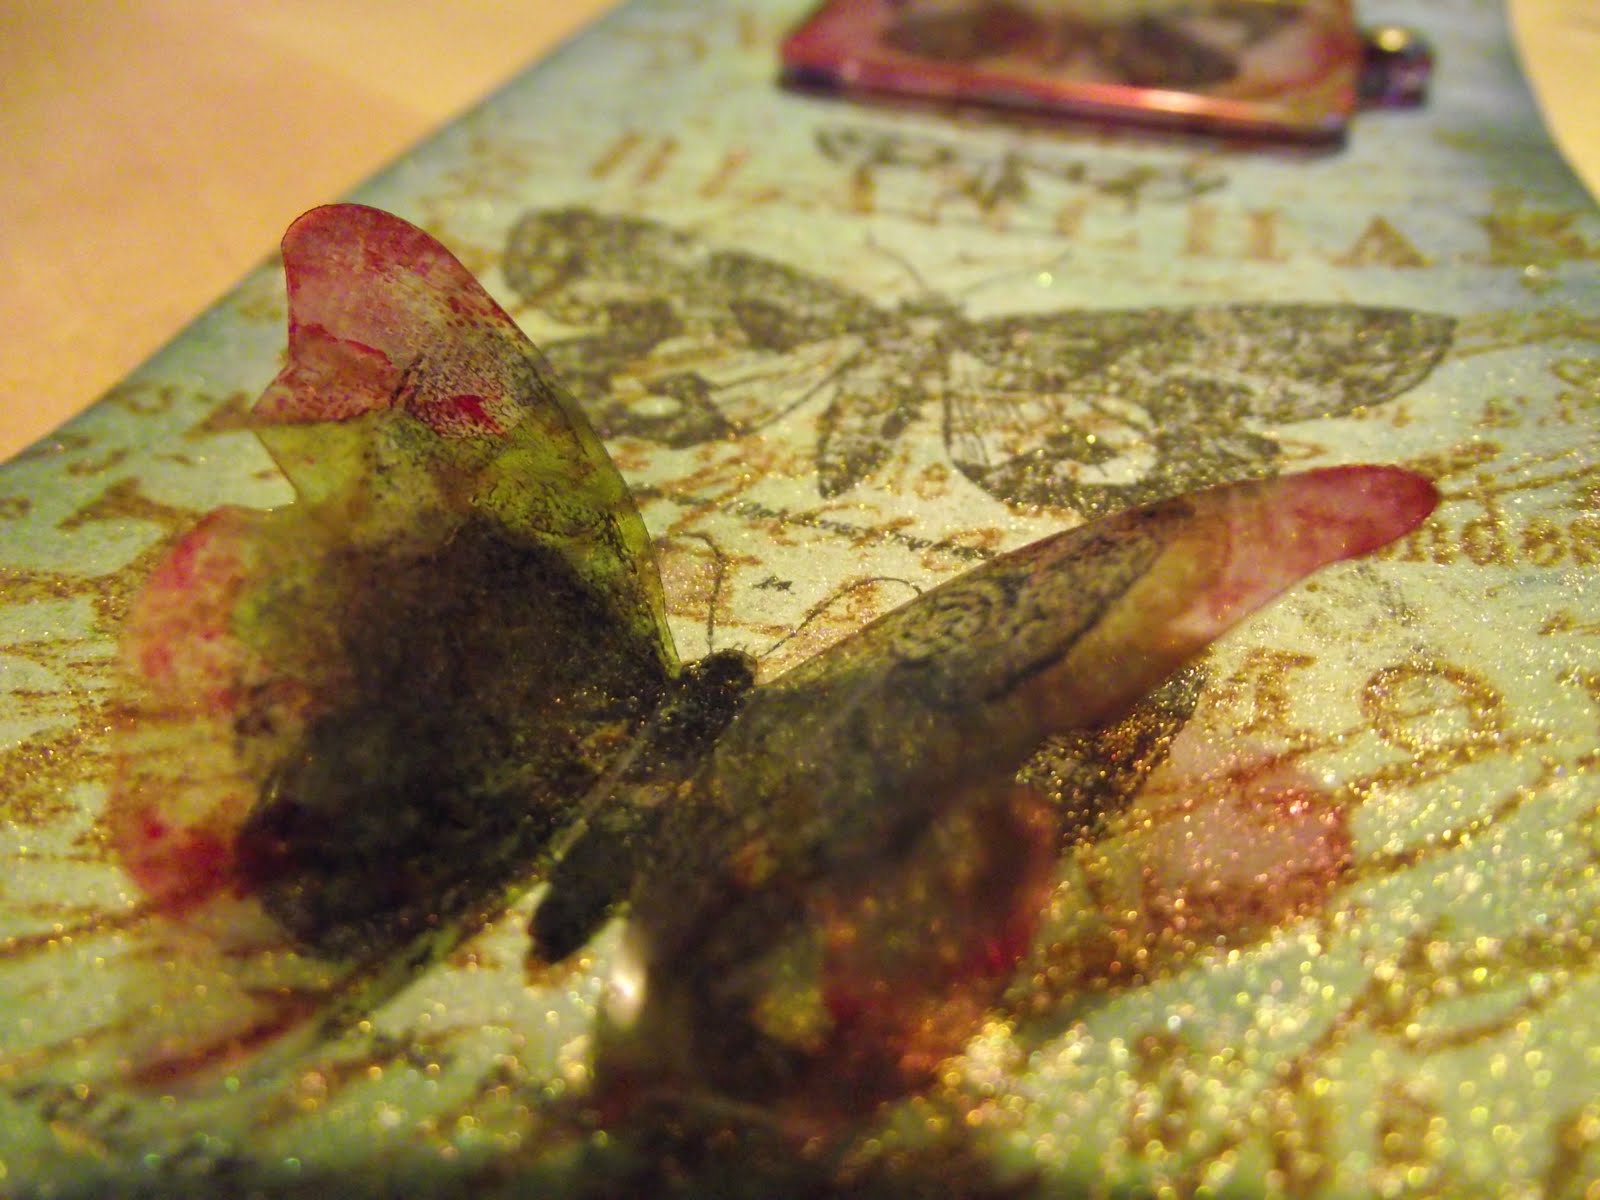
I was further challenged by my no 1 child to use distress ink colours she'd picked from our swatch set (you can have a go and make your own here). so I used the technique on page 38 - Wrinkle Free Distress - using Faded Jeans and Peeled Paint. I misted the tag with water. I then stamped the Papillon script stamp in Vintage Photo and the butterflies in Black Soot. I then sprayed the tag with Perfect Pearls (Heirloom Gold).

Not wanting to leave it there I then played with the technique on page 55 - Tinted Vision Fragments - where I covered a fragment in alcohol inks (Lettuce and Wild Plum) and a little blending solution. I attached it to the tag with a little Glossy Accents and a little brad. I cut out a butterfly from acetate and stamped it with the butterfly from the bottom stamp and then used the same alcohol inks as above. I  bent the wings and attached it with a little glossy accents. Finally I added a little sari material as a ribbon and that's it!  I also had a go at a few more techniques but will show those another day!
I hope you like it!


Gabrielle x


PS: I didn't explain the techniques as it would be much more fun for you to buy the book and then you can have instructions all to yourself... 

17 April 2011

65 not out!


The box lid
I love big birthdays! It's the perfect excuse to go to town on a card. My lovely mum has a big birthday this month and I made her a mini book and thought you might like to see it! It had three 'pages' with each one having an 'M', 'U', 'M'. The letters were stamped and triple embossed with clear embossing powder.
Papers: The papers are from Stampin' Up and an old dictionary.


Mum's mini book
Dies: The dies are all Tim's with his Distress Inks as accents on the shapes. The dies are Tattered Florals, Caged Bird and Sewing Room with the rosette die. I also used Tim's Haberdashery stamp set. The birdcage was embossed with Vintage Photo embossing powder and then clear embossed - gives a really grungy finish!
  
A bit of bling!
Embellishments: The twine round the thread reel and through the buttons is from Stampin' Up and the tag in the middle pages was from an 'East of India' present I was given - never throw anything away! All of the other embellishments are from Tim's ideology range including the tissue tape around the edges of the book. Think I have remembered everything - anything I have missed - just shout!


Gabrielle x


The birdcage in detail
(sorry this is a lot of photos in a row! I am trying to work out how to make them a little less 'listy' - any tips gratefully received!)

Middle pages
The last pages
I 'heart' this die and stamp set!


16 April 2011

Not such a Distressing time!

Inspiration comes in many forms, often when you least expect it! This time I had saved the May 2011 edition of Craft Stamper magazine to read whilst I waited for a small operation (all went well btw!) Anyhow I read a brilliant article by the lovely Linda Elbourne who had made Dulux like swatch cards from Tim's Distress Inks( Please note: The article is on p56 not on p76 as the index says) I just couldn't get this quite brilliant idea out of my brain!

Well, yesterday, no 1 child and I sat down and had a great few hours playing with my distress inks. We followed the instructions pretty closely as Linda had laid out but I have discovered that I can't cut even squares for toffee!!! Not even with my guillotine... hopeless! 
Please read the article as it gives much better instructions but basically:
  • Cut 3 2" squares per colour and one 6" x 2" strip
  • Colour two squares (using Cut n' Dry foam)
  • On the first stamp a flourish 
  • On the second mist with water and wipe off
  • On the third swipe the ink across the square
  • Glue the squares to the strip and write the name of the colour on the bottom square
  • Make a front and back cover and attach altogether with a book ring

I found some colours that I have completely forgotten I had and now I can colour match in a way I couldn't before! Also it was a project that my 10 year old could do with ease and that meant an afternoon of the Easter holidays flew by! Win win!
Huge thank you to Linda for letting me blog this brilliant idea - you are an inspiration!
Gabrielle x

15 April 2011

A good excuse!


I like it when I can find a good excuse to use my new toys and Mother's Day is a great one! I made tags to accompany the 'cards' I made (which were actually fabric hangings!) I am currently very drawn to creams, browns and blacks and so it was really lovely to have a play with pink paper!


This one used Tim's TagTattered Florals and mini bird and cage dies. As I have done before I used two tags with a plain paper on the reverse to write on. They were held together with tissue tape (this time Traveler).The birdcage was die-cut from an old brown envelope covered with Vintage Photo distress ink and a dusting of Perfect Pearls (Heirloom Gold - is there any other?!!!) The bird had a thin layer of Glossy Accents and the flowers were paper covered grungeboard  edged with Vintage Photo distress ink. Finally, the greeting was made on my lovely Dymo! The ribbon was a little strip of sari material - my absolute favourite!


Gabrielle x

14 April 2011

Short and Sweet!


I was lucky enough to need to send a thank you to someone (that always means that someone has done something nice in the first place and some days that feels pretty rare!) so I decided to send a tag (my new latest thing!) that was not only quick but also used up odds and ends!


So, using Tim's tag die I cut out one patterned paper (purchased from Stampin' Up) and one plain cream tag which I stuck back to back and sealed the edges with the very delicious Sketchbook tissue tape. I wrote my thank you on the cream side (I always try and do that first - it's very tricky when the embellishments are on the front - I don't always remember though!)


Then I covered cardboard with dictionary paper and cut out one of Tim's butterflies. I inked the edges with Fired Brick and when it was assembled I covered it's tum with Crackle Accents although I was too impatient to wait for it to crack when I took the photo! The edges stick out from the tag so on the back of the wings was dictionary paper so that when it was turned over there was a bit of continuity!


The 'thank you' was done one our trusty Dymo and just put on a little bit of cream card and the edges inked so it stands out. I added a bit of gold ribbon I bought from eBay last year (I love eBay!) 


It looked lovely and really didn't look like it was made out of a few left overs!


Gabrielle x

13 April 2011

Not very shy and retiring!

I was asked to create a retirement 'card' for a colleague who was leaving work. The brief was incredibly tight as the colleague loved birds, but hated birdcages (that was Tim's birdcage out of the window then!). The card needed to be signed in two different buildings and had to allow for colleagues to send email messages instead. The colours were to be purple and silver which presented a particular problem as, though I do like a bit of purple, I didn't have any suitable card in my stash! Oh! And I needed to create a birdhouse (with a slate roof) just like the one on her garage wall?!


What to do? I quickly realised that if I made pages which fitted within a mini scrapbook then the pages could be distributed for signature without fear of damaging the project and it would also buy me some time to get the project finished. We agreed a template and I quickly got to work! The papers were from HobbyCraft (I was very naughty and forgot to note the name of the manufacturer - humble apologies). I used plain purple cardstock for the pages and cut out tabs for my pages (I love the tab punch from Stampin' Up - couldn't find the UK link - sorry!)


I covered the front and back of two sheets of Tim's grungeboard with plain purple card (stuck with lovely Mod Podge) and edged each board with  Tim's tissue tape (I use the script one from Hobgoblin and the musical notes from Symphony).


I then made pockets from the patterned paper to fit on the inside of the front and back covers for the emails (with a little notch cut of out of each a thumb hole! I 'heart' my circle punch!) 


Both covers were stamped in Shabby Shutters with a background stamp from Stampin' Up that I dimly remember is called Bella Toile. I misted them with Ranger's Perfect Pearls (Heirloom Gold) - mental note: next time mist them BEFORE glueing the pages down to prevent warping and bubbly and all sorts of other horrors!


The birds were from Tim's birdcage - just with their legs amputated - but were covered in dictionary paper, paper with musical notes on and one I stamped in Dusty Concord. Before they were covered in Glossy Accents and Crackle Accents I inked the edges in Dusty Concord to highlight just how pretty they were! There was even a bird on the back (covered in  my favourite stickles!)


The branches were cut from real tree bark (have no idea where I got that from) and the punch I used was a Stampin' Up one (the link was broken) and the bird house was made from on off-cut of grungeboard covered in Vintage Photo and the roof in Black Soot.


Finally I added a few ribbons and trinkets to the binding rings, made a box and put it all together!


What a mammoth post! If you read all that I commend you - didn't realise it would be so wordy! Will try and cut down on my musings on the next one!


Gabrielle x

New beginnings!

So. My new shiny blog! I thought I would write about my crafting journey (especially as I have something very exciting coming up - but I am sworn to secrecy!).


I have been very lucky on my journey so far. I have dabbled in a bit of card making but never really found it a true pleasure and then, after moving to a new part of the country, I met some lovely people who introduced me to scrapbooking in the summer of 2009. I loved the idea of making a memory last so much longer with a gem here and an embellishment there! Since then I have discovered the wonderful world of Tim Holtz whose grungy take on just about everything has really opened my eyes to new possibilities. I have been lucky enough to be commissioned to make things for other people, some of which I will share here, and often this has been at the expense of my own projects!


I hope you like what I make and that you will let me know how I can improve and what else you'd like to see on my new shiny blog!


Gabrielle x