Pages widget

26 December 2012

Behind closed doors

Hello! I hope you are having a wonderful Christmas and that the festivities are carrying on today. My mum, dad, sister and her family are coming to us today and we're looking forward to a lot of merriment, cracker pulling and destroying a box of Maltezers or two!
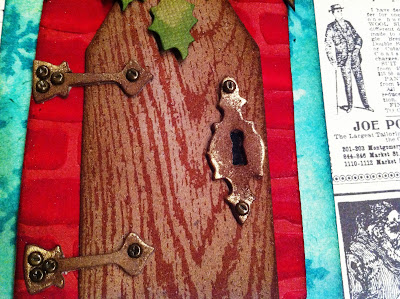
This fortnight’s recipe at Dragonsdream Tag It On has been set by the very talented Blackdragon and isBehind closed doors" - to include a door, a key and a lock (plus the obligatory use of at least one stamp and for it to be on a tag). The brickwork on the house was made with Embossing Paste as I did here and the holly was the same as I made here. The background is Dylusion sprays with Peacock Feathers Distress Ink through the Dylusions snowflake mask on top. The gold highlights are from Treasure Gold.
What's behind the door? Well, in truth, not an awful lot but my imagination says otherwise!
Again, I hope you're having a truly wonderful Christmas, and if you have time during the next fortnight we'd love it if you joined in with the challenge! Happy Boxing Day!
Signature

25 December 2012

Happy Christmas

Santa Su and I hope that you have a wonderful Christmas, filled with joy, chocolates and pressies!
Signature

24 December 2012

Lads tags

For Crafty Boots this fortnight the lovely Sandra has set us the theme of lads TAGS – strictly No girls allowed!!! I wanted to make a tag for Tom's, my son, main present and knowing what a fan Sandra is of Dylusions I used the ink sprays. 
I sprayed a tag with London Blue and Vibrant Turquoise sprays. I then laid the Let it Snow stencil over the top and sprayed London Blue over the top. I cleaned the stencil and laid it on the tag and drew round the snowflakes in white pen. 
I added some Tissue Wrap to some cardboard and die cut Tom's name. I then sprayed the letters as before and added some Aquamarine Treasure Gold to the letters and edges of the tag. I couldn't make a tag for Tom without one for Freya...
Freya's was made the same way (Crushed Grape and Bubblegum Pink sprays) - I didn't use any Tissue Wrap on her name and I used Classic Treasure Gold on the letters and edges of the tag.
I hope you'll join us for this challenge this fortnight - there's lots of ideas on the challenge blog if you're stuck!
Signature

20 December 2012

Flying Heart

There is such an explosion of journalling at the moment that I have been itching to have a go. Confidence was the biggest issue and, having done quite a bit of research on the internet, I thought I’d start small and copy an idea from Wendy Vecchi. Wendy uses small sheets of Ranger’s Speciality Paper and then adds ink and texture to it. I cut my paper to fit within the large Creative Covers and will use this home-made journal as a ‘log’ of my experiments! These experiments are just that. I'm learning as I go along and the more I do the more I will learn! So today I am sharing my first page a flying heart and something a little more Christmassy! 
Sorry my big head is casting a shadow on the bottom of the pages - the light at the moment is awful!
Signature

14 December 2012

I'm dreaming of a white Christmas...

This fortnight’s recipe at Dragonsdream Tag It On is simply 'Christmas' (the only rules this time are that you must use at least one stamp and for it to be a tag). This was my original tag for the challenge but it has photographed so badly I decided to make the tag I showed on Wednesday instead... But in real life this looks fabulous so I'm going to blog it anyway! Apologies in advance for the photos!
I took some corrugated cardboard, painted it white and added Gold Treasure Gold in places. The letters were die cut, stamped with a music stamp and a little more Treasure Gold. The holly was also die cut and painted white before I added Distress Inks to create a subtle colour.
I hope you'll join us this fortnight, sharing your Christmas inspired tags!
Signature

13 December 2012

Snowman's Ticket

I have been having more die cutting fun for Country View Crafts - why not pop on over to see more? This was actually my Christmas Card to the lovely Susan and Richard at Country View Crafts so I hope they liked it!!! They have been so incredibly supportive and such good friends this year - have you checked out their daily Advent Calendar of deals? Really good fun and some bargains to boot! You have to be quick though! I missed a few...!
Signature

12 December 2012

Ho Ho Ho!

This fortnight’s recipe at Dragonsdream Tag It On is simply 'Christmas' (the only rules this time are that you must use at least one stamp and for it to be a tag). I am really experimenting with my Dylusions Sprays at the moment and so I sprayed a tag in Postbox Red and I laid the Ho Ho Holly stencil over the top and sprayed Cut Grass over the top.
I cleaned the stencil and laid it over the top and drew round the words in white pen and the holly leaves in black. I added a stamped sentiment and some holly leaves. There's a little Classic Treasure Gold on the edges.
I hope you'll join in with us this fortnight!
Signature

WOYWW 184

The phenomenon that is What's On Your Workdesk Wednesday is hosted by the gorgeously lovely Julia has entered it's 184th week and my desk is again 'creative'! I think that you can see I've pushed everything to one side to make a small workspace! My double blending tool spinner caught a lot of eyes last week - it's actually two that I have made into one - the other bits make up the kitchen roll holder next to it! The snowman tag in the middle of the desk is this:
The tag was sprayed with Dylusions (London Blue, Vibrant Turquoise, Crushed Grape) then I used Wendy Vecchi's fabulous embossing paste through a Chequered Dots mask and then sprinkled with Dry Glitter for a bit of sparkle. The whole tag was edged in... shock news... Peacock Feathers Distress Ink! Not a hint of Vintage Photo! 
I die cut two snowman One from white card and one from Frosted Film. I cut the frosted film to be just the snowman and then inked the white card with distress inks for the arms, nose and hat. I then added the frosted film over the top and edged with Peacock Feathers Distress Ink. The sentiment was stamped in Peacock Feathers Distress Ink and edged in Gathered Twigs Distress Ink. The snowflake was inked with the same inks. 
The Everything Wendy Vecchi group has a month long challenge to make seasonal projects using Wendy's products and so I am adding this to that! Blimey! If you're still here at the end of all that You've done well! I'm back later today with my next DragonsDream Tag but in the meantime do pop on over to Julia's and see more desks! 
Signature

10 December 2012

Christmas Star

For Crafty Boots this fortnight we have theme of Christmas. I have made a Christmas star! It's one I bought from Hobbycraft for very little money and then I painted with Beach Hut Fresco Finish Paint before sanding and edging in Vintage Photo Distress Ink. I die cut three Pine Trees from thick cardboard, inked them with Distress Inks and a little white paint where I imagined snow might fall. 
The Reindeer was covered with vintage music paper and I gave him a little tinsel pipe cleaner wreath and bell. To get a really good finish on the reindeer after covering with paper, I sanded the edges of the shape, leaving the paper with a smooth finish which meant it took the Vintage Photo Distress Ink On the edge with ease. The 25 was again cut out and covered with London Red Fresco Finish Paint, sanded and I added Vintage Photo Distress Ink over the top.

Hope you feel that you would like to join in with us this fortnight! We'd love to see your creations!
Signature

7 December 2012

Free Project!

Ooh! I have heard that Creative Expressions are giving their customers a free downloadable project from their Project Book - for more details click here...! It's a lovely Christmassy project - perfect for the weekend!
Signature

6 December 2012

Experimental Christmas Heart

I am having a lovely time experimenting with the new Embossing Pastes by Wendy Vecchi! I have yet to discover all of their secrets but I decided to see what would happen if I put a layer of the White Embossing Paste, a layer of Dry Glitter and a topping of UTEE. The effect is really hard to photograph but ut's pretty cool as the glitter is trapped beneath the UTEE - next time I'll make the Embossing Paste more textured as the effect worked better in those areas (that's what experimenting is all about isn't it?!) I chose to make a heart and used Wendy's mask to put the Embossing Paste through. I added the Dry Glitter and set it aside to dry. 
The background was sprayed with Black Marble and stamped holly leaves in Snow Cap ink. I also stamped a holly leaf on the reverse of some black Core'dinations which I'd sanded the front and then I cut it out. The edges of the holly were edged in Pine Needles Distress Ink. I also cut out some berries from red card and attached them. I then die cut and stamped a banner for the front of the heart. 
To finish the heart I cut it out and gave it three coats of UTEE and then cracked it to give it patina and rubbed brown ink into the surface. I assembled the whole piece and realised I couldn't get the photos to show the Embossing Paste - I really need to learn to take better photos! Any way this will become my Christmas Card for my lovely husband...Thank you as always for stopping by!
Signature

5 December 2012

WOYWW 183

Oh what a pickle my desk is in this week! Desk snoopers I apologise for it being such a tip - but then there's not such a lot to look at when it's tidy is there?! I'll keep it short and sweet this week - I didn't get to visit as many desks as I wanted to last week, huge apologies, I'll try to do better this week! If you would like to visit more desks then please pop on over to the wonderful Julia's where she kindly hosts us all! Thank you, as always, for popping by.
Signature

2 December 2012

Embossing Pastes are fab!

The rather lovely, and beyond generous, Wendy Vecchi drew my name out of a hat and sent me a pot of each of her brand spanking new embossing paste (and a few Blossom Bucket goodies that are, coincidentally very difficult to get in the UK) and I just had to have a go...
I used the white Embossing Paste through Wendy's brickwork stencil - it was genuinely really easy to work with and dried pretty quickly! I sprayed the whole piece with Postbox Red Dylusions Spray and, when dry, sanded it back a little to see what would happen... Embossing Paste seems to take what you throw at it! How great it that? 
Wendy is currently making fabulous snowy scenes by adding Ranger's Rock Candy Glitter to the paste... Looks like a fabulous excuse to carry on experimenting! Huge and heartfelt thanks again Wendy - I LOVE the new pastes!
Signature

30 November 2012

A Vecchi Merry Christmas Su

Oh my! It's December tomorrow and the big day is approaching! I get so over excited about Christmas (not so excited about the freezing weather and long queues at the Supermarket checkout!) Anyway, if you read my post yesterday you'll have seen my homage to a Dylusions Santa Su and today I have a Vecchi Su to share with you. I clearly went a bit bonkers and made a holly beard and a poinsettia hat! 
I started by spraying a tag in Postbox Red Dylusions spray. I then laid Wendy's Dots and Stripes mask and, masking areas I misted the tag with water, moved the mask and re misted until I had covered the tag with dots. I then dried the tag and then repositioned the mask and drew round the circles in white pen. Behind Su's head are two swirl stamps from the My Kind of Art set in Snow Cap ink.
For Su I made her as I did yesterday - this time using Peeled Paint Distress Marker for her eyes. The poinsettia was stamped out three times and the holly leaves four times. They were then sprayed with Postbox Red and Cut Grass Dylusions. The leaves and green flower were edged with Mowed Lawn Distress Ink. A little Barn Door Distress Stain on the berries and some clear embossing powder finished it off. The sentiment was added and my second Su was completed!
Quite by chance the December challenge at the Everything Wendy Vecchi group is to make holiday inspired items so I hope Christmas Su counts!
Signature

29 November 2012

Santa Su

I adore the stamp I have christened Su (after Su Pollard - I explained all here!) and when I saw the Dylusions Christmas Accessories stamp set I knew I needed to add a Santa Su to my collection! 
I started by spraying London Blue and Vibrant Turquoise on a white tag shape and dried it. Then I spritzed water through the Let it Snow mask and let it dry and naturally 'bleach' the colour. I dried off the mask and replaced it, drawing round the large snowflakes with a white pen. 
Su herself was stamped onto white card. I masked her eyes and coloured her in with Spun Sugar Distress Stain. Her irises were coloured with Broken China Distress Marker. The hat and beard were stamped on white card and I sprayed her Santa hat with Postbox Red spray. A sentiment from the Christmas Words set finished it off. I have plans for my Santa Su which I'm hoping to reveal soon...!
I have plans for a Wendy Vecchi inspired Christmas Su - I will reveal her tomorrow! Thank you, as always, for stopping by!
Signature